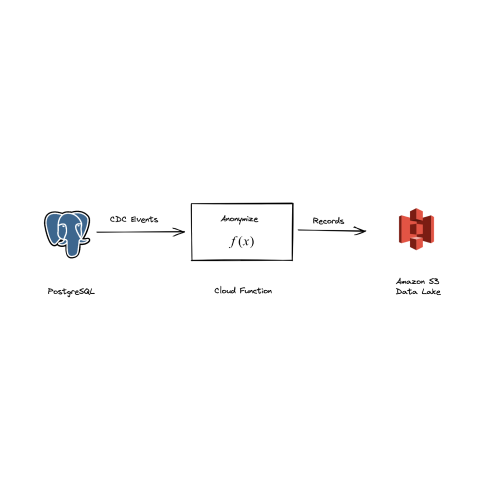
Data lakes have become a popular method of storing data and performing analytics.Amazon S3 offers a flexible, scalable way to store data of all types and sizes, and can be accessed and analyzed by a variety of tools.
Real-time data lake ingestion is the process of getting data into a data lake in near-real-time. Today, this can be accomplished by using streaming data platforms, message queues, and event-driven architectures, but these are very complex systems.
Turbine offers a code-first approach to building real-time data lake ingestion systems. This allows you to build, review, and test data products with a software engineering mindset. In this guide, you will learn how to use Turbine to ingest data into Amazon S3.
Here is what a Turbine Application looks like:
exports.App = class App {
  async run(turbine) {
    let source = await turbine.resources("pg");

    let records = await source.records("customer_order");

    let anonymized = await turbine.process(records, this.anonymize);

    let destination = await turbine.resources("s3");

    await destination.write(anonymized, "customer_order");
  }
};
This application usesJavaScript, but Turbine also hasPython,Go andRuby libraries.
Here is a quick overview of the steps we will take to get started:
- How it works?
- Setup
- Application Entrypoint
- Running
- Deployment
How it works?
A data application responds to events from your data infrastructure. You can learn more about the anatomy of a Javascript data application in thedocumentation.

This data application will:
- Listen to
CREATE,UPDATE, andDELETEevents from a PostgreSQL database. - Anonymize the data using a custom function.
- Write the anonymized data to an S3 bucket.
Setup
Before we begin, you need to setup a few things:
$ meroxa login$ git clone git@github.com:meroxa/turbine-js-examples.gitSince this example uses Javascript, you will need to haveNode.js installed.
- Copy the
real-time-data-lakedirectory to your local machine:
$ cp -r ~/turbine-js-examples/real-time-data-lake-ingestion ~/- Install NPM dependencies:
$ cd real-time-data-lake-ingestion
$ npm install
Now we are ready to build.
Application Entrypoint
Withinindex.js you will find the main entrypoint to our data application:
const stringHash = require("string-hash");

function iAmHelping(str) {
  return `~~~${str}~~~`;
}

function isAttributePresent(attr) {
  return typeof(attr) !== 'undefined' && attr !== null;
}

exports.App = class App {
  anonymize(records) {
    records.forEach((record) => {
      let payload = record.value.payload;
      if (isAttributePresent(payload.after) && isAttributePresent(payload.after.customer_email)) {
        payload.after.customer_email = iAmHelping(
          stringHash(payload.after.customer_email).toString(),
        );
      }
    });

    return records;
  },

  async run(turbine) {
    let source = await turbine.resources("pg");

    let records = await source.records("customer_order");

    let anonymized = await turbine.process(records, this.anonymize);

    let destination = await turbine.resources("s3");

    await destination.write(anonymized, "customer_order");
  }
};
Here is what the code does:
export.App - This is the entrypoint for your data application. It is responsible for identifying the upstream datastore, the upstream records, and the code to execute against the upstream records. This is the data pipline logic (move data from here to there).
anonymize is the method defined for ourApp that will be called to process the data. It takes a single parameter,records. This is an array of records. This function will return a new array of records with the anonymized data.
Running
Next, you may run your data application locally:
$ meroxa app runTurbine will usesfixtures to simulate your data infrastructure locally. This allows you to test without having to worry about the infrastructure. Fixtures are JSON-formatted data records you can develop against locally. To customize the fixtures for your application, you can find them in thefixtures directory.
Deployment
After you test the behavior locally, you can deploy it to Meroxa.
Meroxa is the data platform to run and execute your Turbine apps. Meroxa takes care of maintaining the connection to your database and executing your application as changes. All you need to worry about is the data application itself.
Here is how you deploy:
- Add a PostgreSQL resource to your Meroxa environment:
$ meroxa resource create pg \
--type postgres \
--url postgres://$PG_USER:$PG_PASS@$PG_URL:$PG_PORT/$PG_DB- Add a Amazon S3 resource to your Meroxa environment:
$ meroxa resource create datalake \
--type s3 \
--url "s3://$AWS_ACCESS_KEY:$AWS_ACCESS_SECRET@$AWS_REGION/$AWS_S3_BUCKET\"- Deploy to Meroxa:
$ meroxa app deployThat's it! Your data application is now running. You can now verify the data in your Amazon S3 bucket.
We can't wait to see what you build 🚀.
If you have any questions or feedback:Join the Community