At Meroxa, we're excited to introduce the Conduit connector for Apache Flink, a powerful combination that significantly expands Flink’s capabilities. Apache Flink is renowned for its robust stream processing capabilities, while Conduit offers a lightweight and fast data streaming solution, simplifying the creation of connectors. By integrating these tools, we enhance the options available for real-time data processing.
How It Works
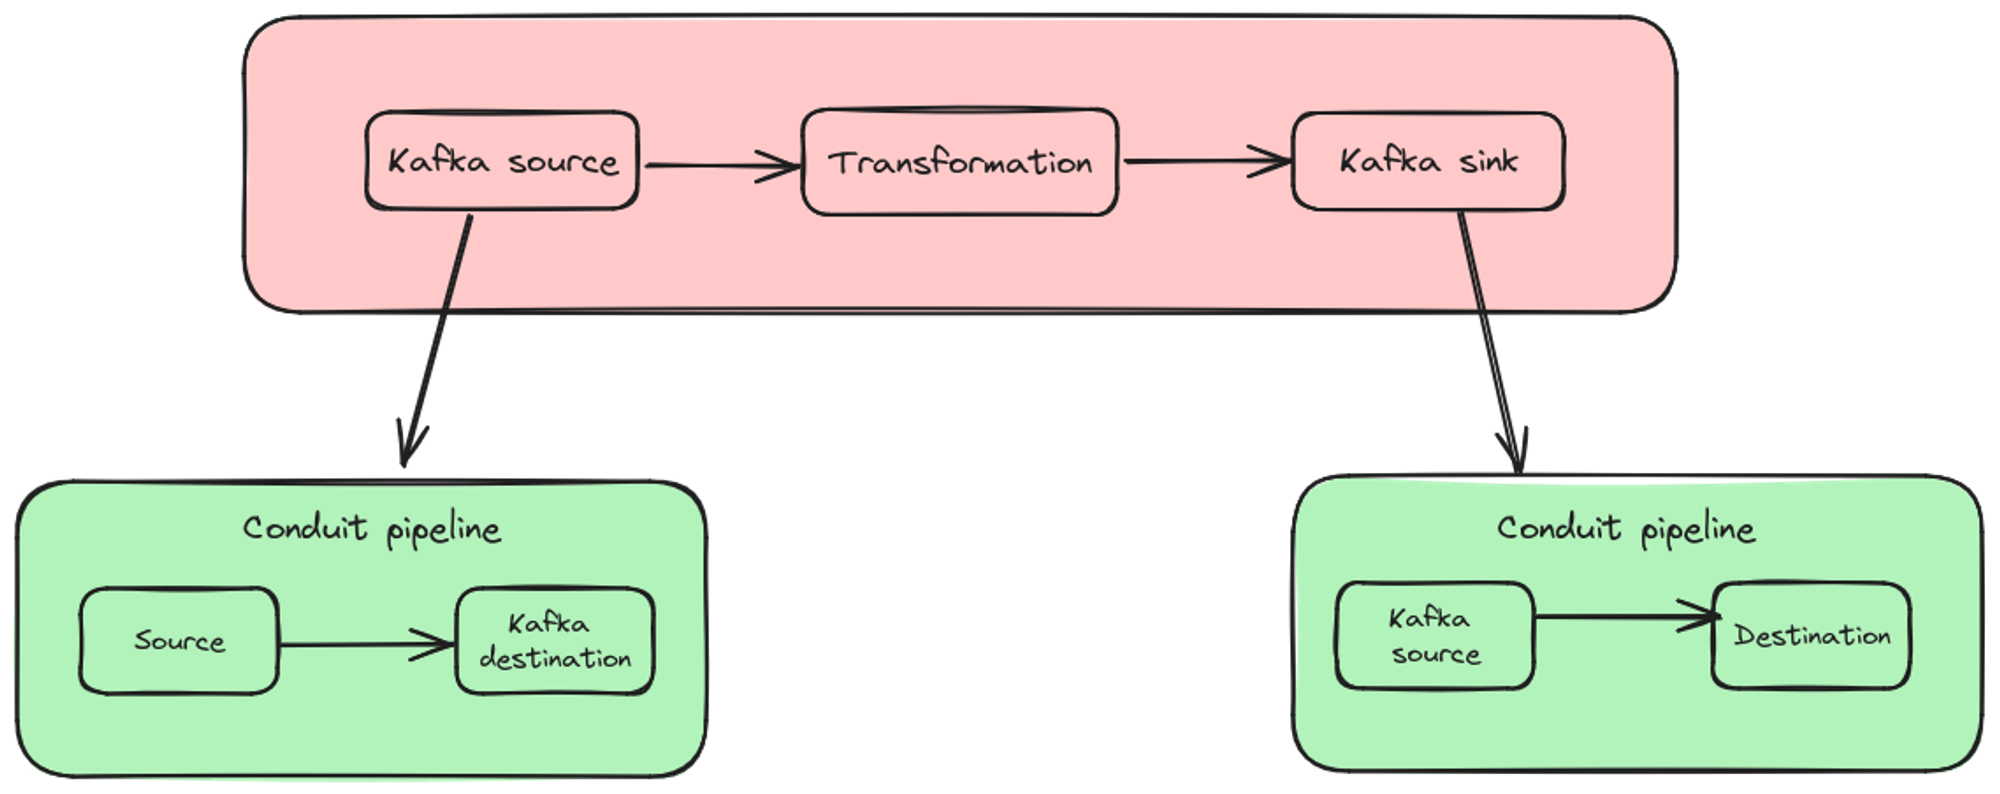
To leverage the robustness of Apache Flink’s Kafka connector, we have designed the Conduit connector to work seamlessly within Flink environments. Here’s a breakdown of the process:
- Flink Source: Represents a Conduit pipeline that reads from a data source and writes to a Kafka topic.
- Flink Job: Processes data from the Kafka topic, transforming it as needed, and writes the processed data to another Kafka topic.
- Sink: A Conduit pipeline reads data from the Kafka topic and writes it to the final destination.
Our Goal
To illustrate the capabilities, we'll demonstrate a job that reads data from Conduit’s generator connector, adds metadata, and writes the data to a file.
Requirements
To get started, you’ll need the following:
- Java 11 or higher
- Maven
- Conduit (refer to our documentation)
- Kafka (ensure
auto.create.topics.enableis set to true)
Setup
First, create a new Maven project and include the necessary dependencies:
<dependencies>
   <dependency>
     <groupId>com.meroxa</groupId>
     <artifactId>conduit-flink-connector</artifactId>
     <version>0.0.1-SNAPSHOT</version>
   </dependency>
   <dependency>
     <groupId>org.apache.flink</groupId>
     <artifactId>flink-streaming-java</artifactId>
     <version>1.17.2</version>
   </dependency>
   <dependency>
     <groupId>org.apache.flink</groupId>
     <artifactId>flink-connector-kafka</artifactId>
     <version>1.17.2</version>
   </dependency>
</dependencies>
Next, write the main class and get a new execution environment for your Flink job:
var env = StreamExecutionEnvironment.getExecutionEnvironment();Adding a Source
Each Conduit source in an Apache Flink job maps to a connector on a running Conduit instance. In the conduit-flink-connector, this is represented with io.conduit.flink.ConduitSource:
// (1) Used to correlate all the pipelines which are part of this app
String appId = "conduit-flink-demo";
// (2) Create a new Conduit source
KafkaSource<Record> source = new ConduitSource(
   appId,
   // (3) Specify the plugin
   "generator",
   // (4) Configure the plugin
   Map.of(
     "recordCount", "1",
     "format.type", "structured",
     "format.options.id", "int",
     "format.options.name", "string"
   )
   // (5) Build a KafkaSource instance
).buildKafkaSource();
Breaking It Down
- Application ID: Specifies an ID for the Flink job. The Conduit connector uses this ID as part of the Conduit pipeline IDs it creates.
- Create ConduitSource: Instantiates a new ConduitSource.
- Specify Connector: Choose the Conduit connector to be used. Conduit comes with a few built-in connectors, and additional can be installed. In this case, the built-in generator connector.
- Configure Connector: A connector’s configuration is usually part of the README. The configuration we have will make the connector produce one record, that has a structured payload, with two fields: an ID and a name.
- Build KafkaSource: Builds the KafkaSource instance.
Writing a Map Transformation
Create a DataStream and add a map transformation to it. The transformation accepts an io.conduit.opencdc.Record and returns an io.conduit.opencdc.Record. Here, we add metadata to each record:
DataStream<Record> in = env.fromSource(
     source,
     WatermarkStrategy.noWatermarks(),
     "generator-source"
   ).map((MapFunction<Record, Record>) value -> {
     value.getMetadata().put("processed-by", "flink");
     return value;
   });
Adding a Sink
Now, write the data into a file:
var sink = new ConduitSink(
   appId,
   "file",
   Map.of("path", "/tmp/file-destination.txt")
).buildKafkaSink();
Connect and Execute
Connect the stream and trigger program execution:
in.sinkTo(sink);
env.execute("Conduit + Apache Flink demo");
Putting It All Together
var env = StreamExecutionEnvironment.getExecutionEnvironment();
String appId = "conduit-flink-demo";
KafkaSource<Record> source = new ConduitSource(
   appId,
   "generator",
   Map.of(
     "recordCount", "1",
     "format.type", "structured",
     "format.options.id", "int",
     "format.options.name", "string"
   )
).buildKafkaSource();

DataStream<Record> in = env.fromSource(
   source,
   WatermarkStrategy.noWatermarks(),
   "generator-source"
).map((MapFunction<Record, Record>) value -> {
   value.getMetadata().put("processed-by", "flink");
   return value;
});

var sink = new ConduitSink(
   appId,
   "file",
   Map.of("path", "/tmp/file-destination.txt")
).buildKafkaSink();

in.sinkTo(sink);
env.execute("Conduit + Apache Flink demo");
Ensure that Conduit and Kafka are running before executing the job. Running the application will generate the following records:
{
  "position": "eyJHcm91cElEIjoiNTU0MTU0NTktOTQ5Ny00OWYyLTgzMGUtMjUyY2EwOTE4YTY5IiwiVG9waWMiOiJmbGluay10b3BpYy1zaW5rIiwiUGFydGl0aW9uIjowLCJPZmZzZXQiOjB9",
  "operation": "create",
  "metadata": {

  },
  "key": {

  },
  "payload": {

  	"id": 3758801242992936400,
  	"name": "petrifier"

  }
}
What we see is a typical OpenCDC record. The .Payload.After field contains an id and a name that were created in the generator connector. Looking at the metadata, you’ll notice "processed-by": "flink" that comes from the map function.
Next Steps
Examine the topics used (flink-topic-source and flink-topic-sink), modify the map transformation, and observe the updated results. For more examples, including PostgreSQL to Snowflake, visit our GitHub repository.
We'd love to hear your feedback on the connector. Join us on Discord, GitHub Discussions, or Twitter/X for more conversations! Also, don't forget to request a demo to learn about our new Conduit Platform!
