Data enrichment and transformations are essential to making the most of your data. Today, we will look at how Meroxa enables developers of any level to enrich and transform their data using a code-first approach. Typically, other real-time transformation vendors limit the type of data manipulation you can do. They typically take a UI approach which limits you to only doing things that the provider has programmed in. With Meroxa’s real-time streaming capabilities and Turbine’s code-first approach, developers have the power to program their data apps any way they want, using languages they are already familiar with.
Here are a few examples of what you can do with Turbine in real-time:
- You could use a hashing library like string-hash to hash sensitive customer data. If you want to encrypt certain data you could use crypto-js to encrypt sensitive data and store the decryption codes in another data store while keeping it relational.
- If you have data that needs to be validated you could write a custom validation function to be run on each record. For example, Phone Number formats in your database could be matched to pass a validation check. Furthermore, you could use a 3rd party API such as Twilio or Telynx to enrich each phone number in your database.
- You can use any API to enrich your data. We’ve seen developers use the Google Maps API to enrich address data to validate and format an address that is easily sharable amongst services.
Overview
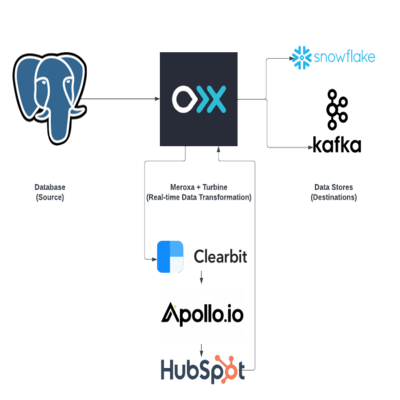
In today's example, we are going to be focusing on how easy Turbine makes it for developers to call multiple APIs to enrich sales data. This application will take a company name (ex: Apple) from PostgreSQL (really, it can be from any data source) and run each record through a series of API calls. Within Turbine, we will be calling the Clearbit API to get the domain name for the company (ex: Apple → Apple.com), then get contact information on employees at the company using Apollo’s Search API (ex: Getting Apple’s CEO, CIO, CFO), and finally, we will create a HubSpot contact for those employees. Later, we will add those Hubspot contacts to a list and dump the data into Snowflake for further analysis and also write it to a Confluent Cloud-managed Kafka cluster for real-time use cases such as personalized outreach. Here is a visual on how this will work:
.png)
The Code
We will use the Javascript Turbine framework to get records with company names from PostgreSQL, run each record through a series of API calls, and write them to Snowflake and Kafka.
💡 If you prefer to use another language, Meroxa also supports Go, Python, and Ruby with many more languages coming!
Requirements
- Meroxa account
- Meroxa CLI
- Meroxa supported PostgreSQL DB
- Snowflake DB (Optional)
- Confluent Cloud Kafka Cluster (Optional)
- Node JS
Setup
Once you have created a Meroxa account and set up the Meroxa CLI you can follow the following steps to get up and running:
💡 Here we are creating the resources via the CLI. You can also do so via the Meroxa Dashboard once you are logged in.
-
Adding your PostgreSQL and SnowflakeDB resources
PostgreSQL (Guide on configuring your Postgres) - Source Resource
Below we are creating a PostgreSQL connection to Meroxa named
leadsapp_pg.Note: To support CDC (Change Data Capture) we turn on the
logical_replicationflag.$ meroxa resource create leadsapp_pg \\\\ --type postgres \\\\ --url postgres://$PG_USER:$PG_PASS@$PG_URL:$PG_PORT/$PG_DB \\\\ --metadata '{"logical_replication":"true"}'Snowflake (Guide on setting up Snowflake) - Destination Resource
Below, we are creating a Snowflake DB connection named
snowflake.$ meroxa resource create snowflake --type snowflakedb --url "snowflake://$SNOWFLAKE_URL/meroxa_db/stream_data" --username meroxa_user --password $SNOWFLAKE_PRIVATE_KEYApache Kafka (Guide on setting up Confluent Cloud/Kafka) - Destination Resource
Here we are creating a Kafka connection named
apachekafka.$ meroxa resource create apachekafka \\ --type kafka \\ --url "kafka+sasl+ssl://<USERNAME>:<PASSWORD>@<BOOTSTRAP_SERVER>?sasl_mechanism=plain" \\💡 Meroxa Data apps do not necessarily need destination resources. If you would just like to read data from a source like PostgreSQL and call APIs you can skip the above.
-
Initializing Turbine in Javascript
$ meroxa apps init leadsapp --lang js -
Coding our Resources
Open up your
leadsappfolder in your preferred IDE. You will get boilerplate code that explains where to code your sources and destinations named in Step 1. In our case we just need to do the following:exports.App = class App { async run(turbine) { // First, identify your PostgreSQL source name as configured in Step 1 // In our case we named it pg_db let source = await turbine.resources("leadsapp_pg"); // Second, specify the table you want to access in your PostgreSQL DB let records = await source.records("leads"); // Third, Process each record that comes in! ProcessData is our function that will call the APIs (See more below) let processed = await turbine.process(records, this.processData); // Fourth, identify your Snowflake DB & Kafka source name configured in Step 1 let destinationSnowflake = await turbine.resources("snowflake"); let destinationKafka = await turbine.resources("apachekafka"); // Finally, specify which table or topic to write that data to await destinationSnowflake.write(processed, "leads_from_pg"); await destinationKafka.write(processed, "leads_from_pg_topic"); } }; -
Coding our APIs
await turbine.processallows us to write a function that runs on each record. Here we can call our Clearbit, Apollo & HubSpot APIs in real-time.💡 This code can be found the apps Github repo here. The functions used to make the API calls are in the Github repo here: getDomainNameFromClearbitgetContactsFromApollo_generateContactDataForHubspot createHubspotContact addHubspotContactToList
async processData(records) { // Loop through each Postgres record records.forEach(async (record) => { // Extract the company name from the Postgres row (Ex: Apple) const companyName = record.get("company_name") console.log(`[processData] companyName:`, companyName) if (!companyName || companyName.length === 0) { console.log(`[processData] [WARN] Could not get companyName from record. companyName: ${companyName}`) record.set("people", [`Could not get companyName from record. companyName: ${companyName}`]) return } // Get the company's Domain Name (Ex: Apple -> Apple.com) const domainName = await getDomainNameFromClearbit(companyName) console.log(`[processData] domainName via:`, domainName) if (!domainName || domainName.length === 0) { console.log(`[processData] [WARN] Could not get domainName via getDomainNameFromClearbit. domainName: ${domainName}`) record.set("people", [`Could not get domainName via getDomainNameFromClearbit. domainName: ${domainName}`]) return } // Call Apollo search API to get contact information on the CTO and VP of Engineering roles const contacts = await getContactsFromApollo(domainName, ["VP of Engineering", "CTO"]) if (!contacts || contacts.length === 0) { console.log(`[processData] [WARN] Could not get contacts via getContactsFromApollo. contacts: ${contacts}`) record.set("people", [`Could not get contacts via getContactsFromApollo. contacts: ${contacts}`]) return } contacts.forEach(async (contact) => { // Generate a Contact object using data from Apollo const contactData = _generateContactDataForHubspot(contact) console.log(`[processData] contactData for createHubspotContact:`, contactData) // Add a new contact column to the Postgres record, which we will write to Snowflake record.set("contact", [contactData]) // Create a HubSpot Contact const contactId = await createHubspotContact(contactData) console.log(`[processData] contactId for addHubspotContactToList:`, contactId) if (!contactId || contactId.length === 0) { console.log(`[processData] [WARN] Could not get contactId via createHubspotContact. contactId:`, contactId) return } // Add each contact we created to a specific HubSpot list await addHubspotContactToList(contactId, 381) }) }) // Return the modified Postgres records to write to Snowflake return records; } -
Deploying Your App
Commit your changes
$ git add .
$ git commit -m "Initial Commit"
Deploy your app
$ meroxa apps deploy
Once your app is deployed, you will see that your HubSpot account has all the contacts for companies in your PostgreSQL DB table, and they will be added to the list you specify in the addHubspotContactToList function. If you opted into moving your data into Snowflake, you will see the enriched data populate in the leads_from_pg table and in your leads_from_pg_topic for Kafka. As records come into your data source (PostgreSQL in this example), your Turbine app running on the Meroxa platform will process each record.
Meroxa will set up all the connections and remove the complexities, so you, the developer, can focus on the important stuff.
Have questions or feedback?
If you have questions or feedback, reach out directly by joining our community or by writing to support@meroxa.com.
Happy Coding 🚀